Endpoint Administration
Endpoints are the term given to the private networks hosted on your TunnelHound appliance. Each endpoint can have an associated set of devices, which represent ways your users can connect to your TunnelHound appliance.
Most implementors only want one endpoint, but for certain use cases (such as restricting traffic for certain devices), it makes sense to have multiple endpoints.
Managing Endpoints
Endpoints are managed in the administration interface. This interface is accessible only to super users via the Admin item in the navigation bar.
On the endpoint page, you’ll see a list of endpoints. From here, you can search endpoints by using the search bar, edit existing endpoints, or add new endpoints.
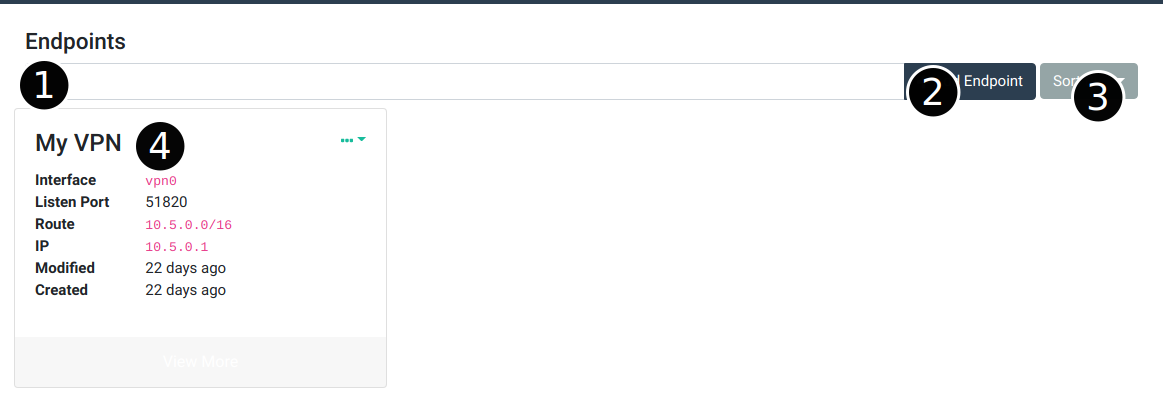
Here are the main components of the page:
- Endpoint search bar – You can search endpoints by typing in a keyword here. You can also search by field by choosing the appropriate options in the search dropdown. For more information on search dropdowns, see the search page.
- Add endpoint button – Click this button to add an endpoint. See the add an endpoint section below.
- Endpoint sort button – Use this dropdown to determine how the search results are sorted
- Endpoint card – Every endpoint will appear in this list as a card. Some basic information about the endpoint is displayed. Clicking the
...in the top right corner will let you edit or delete the endpoint. You can also click the gray View More button to go to the endpoint detail page. See the section on editing endpoints below.
Adding Endpoints
To add an endpoint click the Add Endpoint button (item 2 in the diagram above). This will pop open the ‘Add Endpoint’ modal.
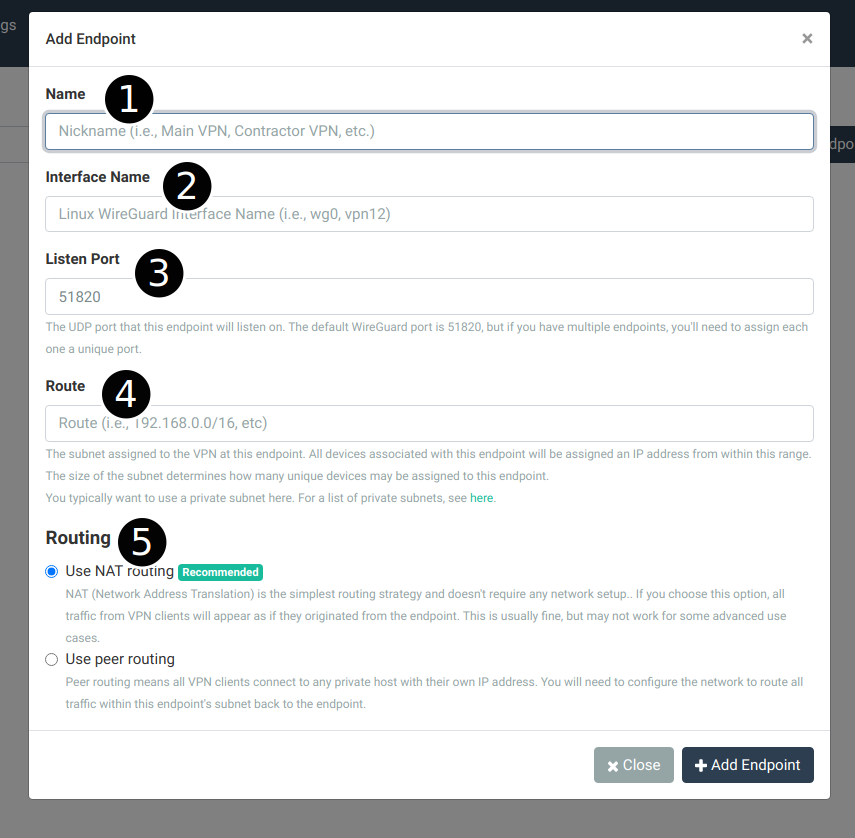
The items in this popup are described below:
- Name – This is the human-friendly name for this VPN. This is only used in the TunnelHound appliance interace. Good names are things like ‘Your Company Name VPN’ or ‘Office VPN’ or ‘Personal VPN’ or even ‘My VPN’.
- Interface Name – This is the Linux network interface name corresponding to the WireGuard® device created on the appliance. Typically this is something like
vpn0orwg0. You can use any ASCII character here, but it must be less than 16 bytes. - Listen Port – The UDP port on which to listen for WireGuard® traffic for this endpoint. The default is usually okay, but if you have multiple endpoints, you need to choose an unused port. You can’t host two endpoints on the same port, and you’ll see an error if you try. Whatever you choose here, you must make sure the UDP port is open on your cloud provider’s firewall or passed through your Docker container.
- Routing subnet – The IPv4 subnet that this VPN should have access to. This must be larger than the WireGuard VPN subnet, and can include the entire internet (i.e.,
0.0.0.0/0) for a full-tunnel configuration. Traffic received by this endpoint destined for any address here will be routed according te the routing policy set below. - WireGuard VPN subnet – The IPv4 subnet assigned to devices in this VPN. Devices connecting to this endpoint will automatically be assigned a unique IP in this range, which means the size of this range determines the maximum number of devices that can connect to this endpoint. It’s best to choose a private range which has enough addresses available for your use case. If you make a mistake here, you can change it later, with some caveats. You typically want to choose an unused subnet that’s already within your existing private network range. See the editing section below.
- Routing – Routing determines how packets received at this endpoint from authenticated devices get routed to IP addresses in the private network. The default is NAT (Network Address Translation), which means that all traffic from VPN devices appears to devices in the private network as originating directly from the TunnelHound appliance. This set up is easy and works fine for typical network loads, such as HTTP, FTP, SSH, etc, but may break some assumptions of some applications, such as peer to peer services. To handle these complicated use cases, choose peer routing. This means that VPN device traffic appears unaltered to the private network, but can require additional configuration. See the page on routing basics for more information.
Editing Endpoints
Once configured, most details about endpoints can be altered, with some caveats. To edit an endpoint, click the View More button on an endpoint card in the admin interface.
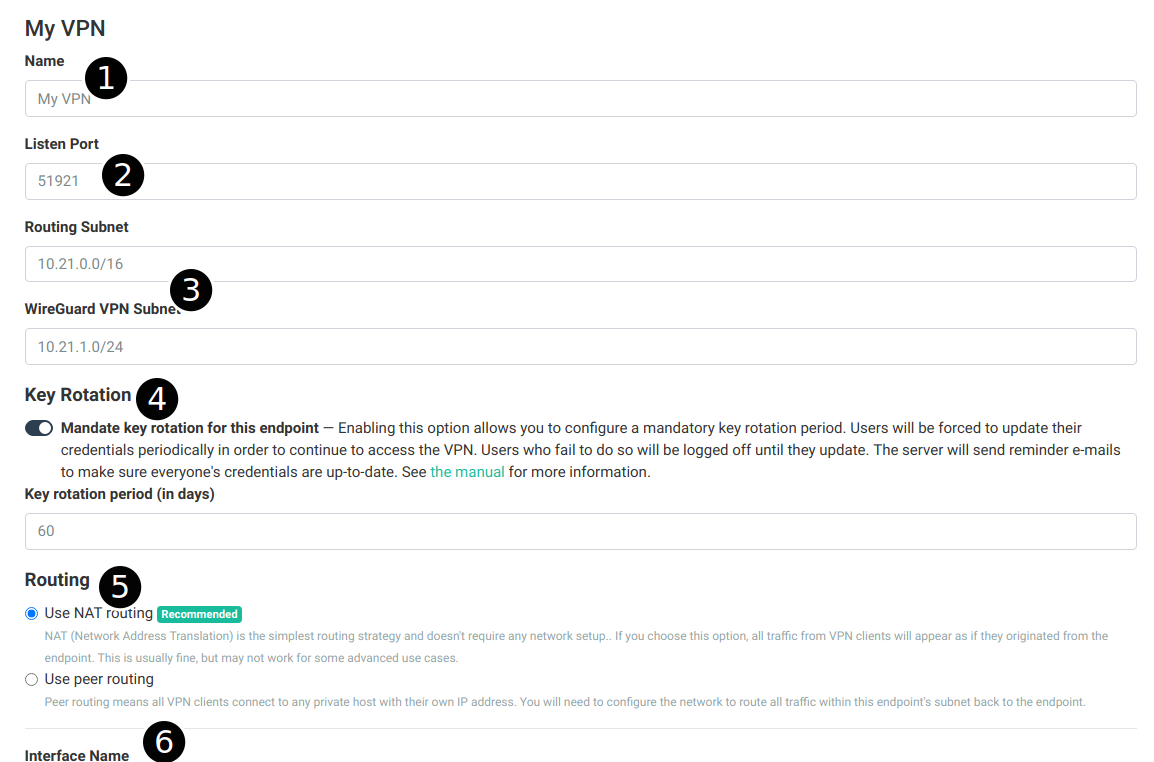
The items in this page are similar to the ones on the ‘Add Endpoint’ popup describe above. Described below are caveats about editing certain fields:
- Name – The name of the endpoint can be changed without issue.
- Listen port – Changing the listen port of the interface will require every user to refresh their configurations. The system will automatically send out a notification e-mail to every user with a device associated with this listening port.
- Routing subnet and WireGuard VPN subnet – Changing these routes will require every user to refresh their configurations to propagate the address changes. The system will automatically send out a notification e-mail and refresh all device credentials. This will cause all current connections to be dropped.
- Key Rotation – You can enable key rotation on this endpoint to ensure that no client key older than some preset time is allowed to access the VPN. Users will receive automated advance notices when their keys are about to expire, so that they can update their credentials. See the corresponding section for more details.
- Routing – The routing strategy can be changed any time and (assuming a proper peer routing configuration on the network) will not cause issues for new connections. Existing connections will be silently dropped.
- Interface Name – The interface name cannot be changed once set.
Once any field is changed a bar will popup at the page bottom where you can save or reset the form.