Device Administration
Devices are the physical devices your users use to access the networks behind your endpoints. A device has an associated key pair, the public part of which is stored on the server and the private part on the accessing device. In this way, communication is secured between the device and the appliance.
Note: this page is about administering devices for all users. For information on how to set up devices for your user, see the self-service device setup page.
Any device that supports WireGuard® can be configured for use with your TunnelHound appliance. Currently, the appliances provide instructions for:
- Windows
- Mac OS X
- Linux (generic + several distros)
- Android
- iOS
If there is another type of device you’d like first-class support for, please e-mail [email protected].
Managing devices
Devices are managed in the administration interface, which is accessible only to super users via the Admin item in the navigation bar.

On the devices page, you’ll see a list of devices. From here you can search devices by using the search bar, edit existing devices, or add new ones.

Here are the main components of the page:
- Device search bar – You can search devices by typing in a keyword here. You can also search by field by choosing the appropriate options in the search dropdown. For more information on search dropdowns, see the search page.
- Add device button – Click this button to add a device. See the section on adding devices below.
- Device sort button – Use this dropdown to determine how search results are sorted
- Device card – Every device for every user will appear in this list as a card. Some basic information about the device is displayed. Clicking the
...in the top right corner will let you edit or delete the device.You can also click the gray View More button to go to the device detail page. See the section on editing devices below.
Device listings
Each device in the system will be represented by a device card, such as the one below.

The relevant fields are:
- Name – The human-readable name given to a device by its user. These are not necessarily unique, even for devices owned by the same user.
- IP – The static IP address assigned to this device, within the owning endpoint’s subnet.
- Endpoint – The endpoint this device connects to.
- Public Key – The WireGuard® public key assigned to this device. The private key is stored on the device and authenticates uniquely with this public key. Click the Show button to reveal the text representation of the public key.
- Modified – The last time the device was modified by TunnelHound
- Created – When the device was created
Device quick actions
The ellipsis menu at the top right of the device card provides access to some quick actions:
- Edit – Go to the device detail page, where you can view more information about the device or edit it.
- Delete – Remove the device.
- Lost credentials… – Reset the device such that the owner has to log back in to the TunnelHound appliance and regenerate their credentials in order to access the VPN.
Adding Devices
To add a device, click the Add Device button (item 2 in the diagram above). This will open the Add Device modal.
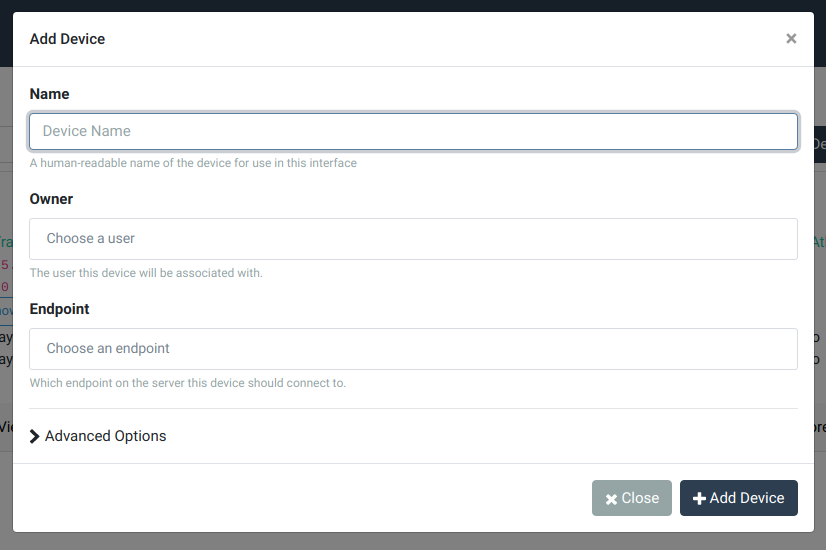
The items in this popup are described below:
- Name – The human-readable name to give to the device. This would be something like ‘Work laptop’ or ‘Home computer’. These names do not need to be unique and are meant to serve as a way to help you quickly identify a device.
- Owner – Which user will own the device. Start typing a name or e-mail to auto-complete.
- Endpoint – Which endpoint to create the device under. Start typing a name or interface name to auto-complete.
If you expand the Advanced Options section, there are some more options for advanced users.

The relevant fields are:
- IP Address – You can choose to assign an explicit unused address within the endpoint’s subnet, or you can ask TunnelHound to automatically pick the next available address (the default). Most of the time, you’ll want to stick with the default.
-
Encryption Keys – When creating devices for other users, it’s safest to leave this at the default setting. This will create the device but will not activate it. The owner will be notified via e-mail that a device has been created for them. When they log in, they will have to generate credentials for the device before being able to download a configuration. This is safest, because the private key never leaves the device it’s generated on.
For those with more advanced requirements, the following options are available:
-
Use auto-generated client-side private key – This creates the device owned by the selected user and generates a key pair for it. You’ll have to download the WireGuard® configuration yourself and provide it to the user directly. This is slightly lesssecure than the default, because there is a risk that the private key is compromised while you transmit it to the user, or that the configuration file ends up being stored where it is publicly accessible. If you use this option, download the configuration and transmit it securely, and then immediately delete the configuration from your machine.
-
Use custom private key – This will let you specify a private key (as generated by the
wg genkeycommand or another WireGuard® compatible utility). This is slightly less safe than the default for the same reasons as above.
-
Editing Devices
To edit an existing device, click the ‘View More’ button beneath the device card on the administration page.

From here, you are free to change most details of a device, including the name and IP address. Changing the IP address will automatically send the user a notification, unless you request not to. To save your changes, modify a field and then click Save in the popup bar at page bottom.
